Showing posts with label Tutorial. Show all posts
Read More Ninja Action!

Getting the "parent" property to work in Actionscript 3. Mom? Dad?!

Hey everyone!

Today I'll be helping you with a quick tutorial on using the "parent" property in Actionscript 3. If you're used to how things worked in AS2 you know that you can no longer refer to the parent of a clip with this simple notation:
myClip.parent.parent.parent.myMethod();
The compiler is more strict and so they've changed the syntax a bit. I want this to be a beginner's tutorial so I won't go into detail about that, let's work on the new way to do things!

First, I've made a movie with a clip on the timeline. I wrote a function on the mail root level of the timeline that looks like this:
function traceParent():void
{
trace("You've succesfully called on the parent!");
}
Easy, just a trace statement to see if what we code inside the clip is correct. Now, put a clip on the stage and INSIDE the clip put this script:
myButton.addEventListener(MouseEvent.CLICK, callOnParentClip);

function callOnParentClip(ev:MouseEvent)
{
(this.parent as MovieClip).traceParent();
}
Pretty easy! Above the content inside this clip, make sure you make a button called myButton to call this function. The key line is here:
(this.parent as MovieClip).traceParent();
You can see that now we have to cast the clip as a MovieClip specifically. What about if we have a clip more than one level deep? This is how you would handle that:
(this.parent.parent.parent as MovieClip).traceParent();

Very simple. Check out the source below for an example clip using this technique, and happy coding!

Sample (AS3, Flash CS4)
Read More Ninja Action!

Quick Tip: Inline functions with Tweener and addTween

Hi everyone, here is a really quick tip for Tweener users. I just came across the following situation in a contract. I had to move something to the side of the stage with Tweener, and then set the visible to 0 to prevent users from clicking hidden buttons that were inside the clip. So, to move off the stage I just used this tween:

Tweener.addTween(page1Content, {alpha:0, x:-266, time:1, onComplete:hidePage1Content});

See how lunky that is at the end? I really don't want to have to write a whole function just to turn the thing off, but there isn't a way around that given the timing of Tweener. It HAS to wait until the Tween is complete. So, after a bit of thinking and digging I was able to add an inline function to do this for me and save me some function writing. This is what I ended up with:

Tweener.addTween(page1Content, {alpha:0, x:-266, time:1, onComplete:function() { this.visible = false; }});

Now the inline function runs right after the content fades out with no additional function writing necessary.
Easy!
Read More Ninja Action!

Method Error 500 - Maximum Length Exceeded with AJAX

I have ASP.NET application where I'm using jQuery to return data from the server all AJAX like. Next thing you know, my AJAX method is blowing up on me saying "Method Error 500 - Maximum Length Exceeded."

Naturally, I freak the fuck out and start stressing. I'm thinking that I can't return the amount of JSON data that my users need. But thankfully this one is a quick fix.

If you go into your web.config file you will notice a section called <system.web.extensions> which contains a sexy little node named "jsonSerialization." By implementing the logic below, you can quickly increase the maximum size limit of your AJAX queries.


It would of course be nice if Microsoft slapped a unit on there; for my measure I increased mine to 50000 donkeys.
Read More Ninja Action!

Using Masks and MovieClips on the timeline with Flash CS4

Hi everyone, welcome to another NinjaCamp Flash tutorial. This time around I'll be writing about the masking process in Flash. We'll be using masks on the timeline, the easiest way to mask content. Soon I'll write a more advanced article about dynamic masking with Actionscript 3. Let's get started!

This is what we'll be making:


It doesn't look like you have a flash player...at least I can't find it. I'd tell you to get one...or to go to sites like Adobe.com, but you know...I'm not the boss of you.

First, the basics of masks. We use masks when we want to hide part of something on the stage. In other words, we mask parts of an object. Normally this isn't very exciting, but the real benefit of masks come in when you animate them to produce cool effects in Flash. This has a lot of applications- gaming, information design, web content, you name it. They are very commonly used and you should add them to your Flash toolkit.

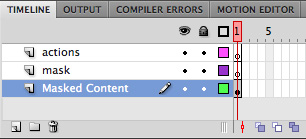
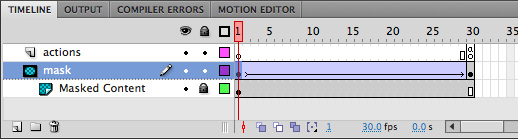
I'm going to show you how to set up a basic mask on the timeline and animate it, revealing a logo (in this case, a MovieClip). I've set up a simple Flash file with some artwork and the following layer structure:


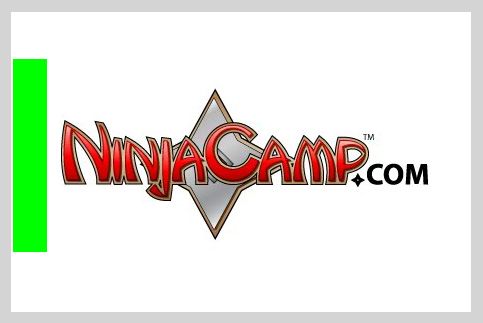
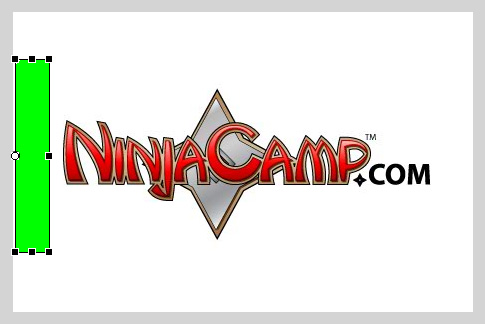
This animation is going to be a simple reveal from right to left, but you can get really crazy if you want. Masks can be any shape, and the color doesn't matter. On the timeline, Flash doesn't support gradient masks very well, but I have a tutorial about that coming soon as well, so learn the basics first and come back for that later! I'm going to draw a simple box on the stage in my "mask" layer. I position it to the left of the logo artwork and make sure it is tall enough to completely cover the logo. The width is unimportant, as I will be animating that to fit. I normally use bright colors for these shapes so it's easy to tell where my masks are. Here is what my stage looks like after this step:


Now common sense might tell you that the mask would cover and hide whatever it's over, so why did we move it off to the side if we want the logo hidden to begin? Well, Flash works in a counterintuitive way with masks, the areas of the masked content which are covered with the mask will be visible. So, to completely show an object the mask must cover the object completely. No problem! the next step is to make our mask a MovieClip so it can be animated easily. Some people use shape tweens for this but I like the flexibility of using the same mask elsewhere in my movies. Select the mask artwork on the stage and press F8, or in the menu "Modify > Convert to Symbol...". Name the symbol "myMask" or something similar, make sure type is set to Movie Clip and press OK to close the dialog. On the stage, your mask should now be a MovieClip object. Good work!

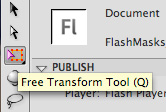
The next thing I usually do is adjust the centerpoint of the mask clip on the stage so it will tween properly. Select the Free Transform Tool from your toolbar. It looks like this:


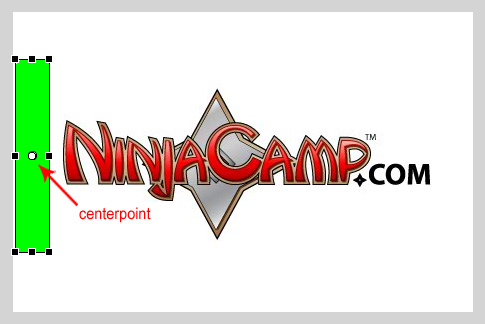
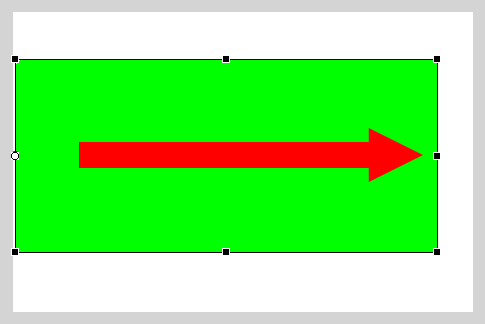
Next, select the mask on the stage. You should see transform handles around the clip and a circle in the middle representing the centerpoint, or point from which animation will be based. See the image for reference:


Click and drag the centerpoint to the left side of the clip, as we will be animating it to the right. It should look like this when complete:


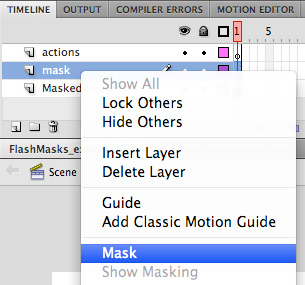
Before we animate there is a special and important step we need to take. We need to make our mask clip a mask! To do this, right click the layer name "mask" in the timeline. Choose "Mask" from the menu:


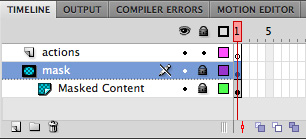
A few things will change with your layers on the timeline. Your "mask" layer will have a new mask icon next to it for starters. The "Masked Content" layer will also have a new icon showing that it is being affected by the mask, it will also be indented a bit. Keep in mind that Flash only does this to the layer directly below the layer you made a mask, but you can drag additional layers beneath the mask, a mask layer can affect more than one content layer. Also, both of our layers have been locked. See the image:


On the stage, everything is gone?! Don't panic! Let's think about this... our mask was not covering the logo on the stage, and when we made it a mask it disappeared. This is because masks themselves are never visible in the final output. Since the logo is not covered with its mask, it too has vanished. We just need to animate the mask to cover the logo and make it appear again. In the editing tool, Flash will only show content being masked properly on the stage if the mask layer and all masked content layers indented beneath it are locked. Keep in mind that this is only while editing a movie, when you export the .swf Flash will always mask everything correctly no matter how the layers are locked or unlocked. So, unlock the mask layer so we can animate it! Everything is visible again, so relax ;)

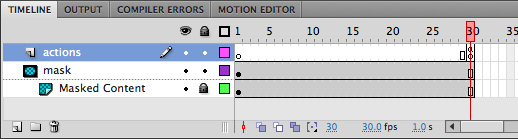
Finally we animate the mask and bring it all together. I'm going to make my animation 30 frames long, so I add those frames in all three layers (by selecting the 30th frame in each layer and pressing F5), and add a "stop" action to the final frame of "actions" (which I made a keyframe with F6). I just want to reveal my logo, I don't want it to loop endlessly. See the result:


I have to admit to you, I still use the classic tweens in Flash for simple things like this. The new tweening system in CS4 seems to be quite powerful, but it tends to make me pull my hair out sometimes. Let's use a classic tween for this mask as well. Select the 30th frame of the "mask" layer and press F6, making it a keyframe (Insert > Timeline > Keyframe from the menu). Go back to frame 1, right click it, and select "Create Classic Tween". You should see a blue arrow going from frame 1 to frame 30 like this:


With frame 1 selected, I usually go to my "Properties" panel and set easing to 100 under "Tweening". This will make the mask slow gradually as it approaches the end of the animation, which for me is a bit more visually pleasing than an abrupt stop. Finally, select the final keyframe, select the mask on the stage with the Free Transform Tool, and drag the right side of the mask all the way to the right, just covering the logo completely. See it here:


All done! You can either lock the "mask" layer and scrub the timeline to see the effect, or just test your movie by pressing Command/Control and Enter. Pretty cool! Try and think of some interesting things you can do with masks, and I will follow up with some more advanced techniques in later tutorials. Take care!

Sample (AS3, Flash CS4)
Read More Ninja Action!

jQuery Intellisense : Get the $ out!

I came across a little problem today while working...it involves jQuery, Visual Studio 2008, Intellisense, and a monkey.

In short, I was able to solve the problem (except for the monkey which is still attacking) and I thought I would share my findings.

As we all know, JavaScript libraries are currently "the shit" when it comes to UI design. From Prototype to Script.aculo.us, everyone seems to be jumping on the JavaScript band wagon.

Knowing this, the geniuses over at the jQuery open source project have written their library so that it could safely run alongside other libraries. There are a few ways to do this, but I'm only going to talk about one method which I personally prefer.

Seeing as how everyone just loves to use the dollar sign as the primary entry point, you quickly find these libraries overwrite each other. However, jQuery provides us a simple fix with the "noConflict" method. Thus, loading the jQuery library, then executing "jQuery.noConflict()" removes all jQuery references to "$" and gives them back to the previous owner.

Now, that's cool, but what if I still want to use something short like "$" rather than typing "jQuery" every time? Simple! They have a fix for that too!

<script type='text/javascript' src='jqueryJs.js'></script>
<script type='text/javascript'>
var $j = jQuery.noConflict();
</script>
Now, all of your jQuery commands can be accessed using "$j" or whatever else you would like to use. However, that is where the problem with Visual Studio Intellisense pops up.

As you might imagine, Visual Studio 2008 SP1 has no idea what "$j" means. So you lose all of your jQuery intellisense abilities the second you do this. But that's why you're reading this tutorial! I have a hack which will get you right back on track. That was an unintentional rhyme. :P

After following Scott Guthrie's instructions on how to get jQuery intellisense working in Visual Studio 2008, you simply need to take it one step further to include your previous change.

Open the jQuery VS Doc file (I'm working with jquery-1.3.2-vsdoc.js) and look for the following code on line 51:

jQuery = window.jQuery = window.$ = function(selector, context) {
This line identifies the jQuery commands to the IDE. Thus, all you need to do is modify it so that it includes your new command value:

jQuery = window.jQuery = window.$ = window.$j = function(selector, context) {
Once it is saved and visual studio has a chance to repost, you will instantly start seeing the intellisense results following "$j" or whatever command you choose.

Happy Coding!
Read More Ninja Action!

Adding web links to Flash in Actionscript 3 using NavigateToURL

Hello everyone, welcome to another NinjaCamp tutorial here at experts.ninjacamp.com! This time around I'll be showing you how to navigate to web links from within your Flash movies.

In actionscript 2, we could use the getURL method to do this. It was pretty simple, but things have changed a bit in Actionscript 3. Let's look at a finished block of code with this functionality and then take it apart line-by-line:

myBtn.addEventListener(MouseEvent.CLICK, gotoUrl);

function gotoUrl(ev:MouseEvent):void
{
var url:String = "http://www.ninjacamp.com";
var request:URLRequest = new URLRequest(url);
try {
navigateToURL(request, '_blank');
} catch (e:Error) {
trace("Error occurred!");
}
}

Pretty easy! Let's take a look. In line 1 we are adding an event listener for our button. This is the same easy stuff I covered in another tutorial here, and just makes it so that when you click the button a function is called- in this case it's our gotoUrl function.

Now we define our function in the next block of code. In line 4 we need to define our target web address. We create a new String variable (since it's just a string of text) and put the full address with http:// in quotes. Simple.

Next, in line 5, we define our URLRequest object. This is where the AS3 version of this process gets a little wordy! In basic terms we are wrapping our URL text into a format Flash can accept with its navigateToURL method.

The next part is optional but usually good practice. We wrap the actual navigation code in a try catch statement. This is a way for Flash to catch errors as they happen and handle them without borking the whole movie. Basically, we use this because if the URL is dead we want to be able to continue the movie gracefully. Just put any code you want to execute if it errors out in the "catch" section of the statement.

Line 7 is where we actually execute the code to go to the web address specified in line 4. It works very similarly to getURL, we just hand it our "request" variable, and tell it to launch in a "_blank" window. You could replace blank here with "_self", "_parent", or any other named window you're manipulating with javascript or the like. It's just a string and works like regular href tags in HTML. That's about it! I've included a sample FLA below so you can see everything working together. Thanks and have fun!

Sample (AS3, Flash CS4)
Read More Ninja Action!

Animating with Tweener

Hi everyone! One of the things I think a lot of newer Flash users may not understand is that you can use third party classes like Tweener to help you in Flash. It's quite easy, I've put together a tutorial to illustrate how to get it all rolling. So don't be intimidated, this is a great time-saver and it will let you really add an extra level of interactivity to your work!

What is Tweener?
Tweener, homepage here, is one of several third-party classes designed to control animation in Flash. It can be used for simple things like animating something across the stage, or more complicated things like applying easing to custom variables in your code. I use it a lot in my work, and once I started it was obvious what a great help tools like Tweener can be!

First, get it!
This is the first step. Go to the page above and download the latest version, which will be a zip file with a folder structure containing some actionscrpt files. Most of us have a centralized location for all of our work, and you'll want to unzip the files to that location. Really, Tweener can be put anywhere on your computer your Flash files can access it. You only need to download it once, then you point each Flash file that needs to use it right to that folder.

Let's begin
Create a new blank as3 file in Flash. Save it to your hard drive whereever you like. Now the first step is to point that file to the Tweener installation so that it knows where to look for all that code.
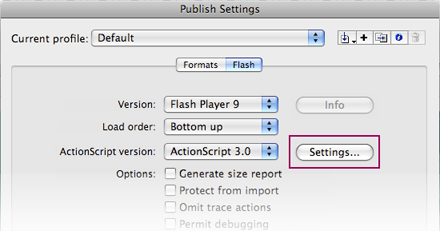


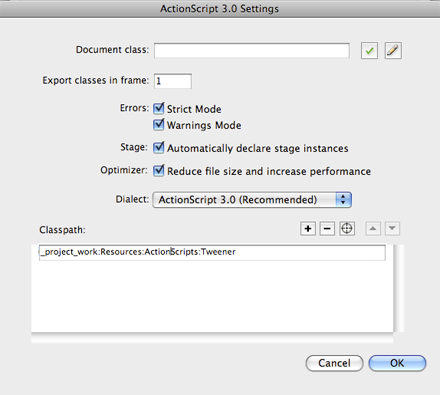
Select "File" > "Publish Settings" from the File menu. Next to "Actionscript Version" there is a button that says "Settings...". Select that. At the bottom of the next window you'll see "Classpath:". This area is where you can enter all of your third-party classes so Flash can use them at runtime. Click the little target icon and navigate to the main folder of your Tweener installation. It should be the highest in the heirarchy, and contain a folder called "Caurina" which has everything else within. That's it, you're ready to use it now!

Set up your content
This is going to be a very simple example, but one which is also highly useful. One of the benefits of animating with code as opposed to the timeline is that we can react to events from within the code quite well. In this case, we can set a sequence of animations into action, and then replay them all again once the initial sequence is finished. It's looping animation without using the timeline, and highly flexible!

First, I've created a layer for my content and one for my actions. In my content layer, I've simple created 5 bubble shapes with instance names bubble1 - bubble5. It's important to give anything you'd like to animate with Tweener an instance name! Tweener uses these names (not the symbol name!) to call on things on the stage. After this, it's as simple as copying and pasting this code into your actions layer, all on frame 1:

import caurina.transitions.Tweener;

bubbleAnimation();

function bubbleAnimation():void
{
Tweener.addTween(bubble1, {scaleX:1.6, scaleY:1.6, time:5, transition:"easeOutElastic"});
Tweener.addTween(bubble1, {scaleX:1, scaleY:1, time:5, transition:"easeOutElastic", delay:5});
Tweener.addTween(bubble2, {scaleX:1.5, scaleY:1.5, time:4, transition:"easeOutElastic", delay:1});
Tweener.addTween(bubble2, {scaleX:1, scaleY:1, time:4, transition:"easeOutElastic", delay:5});
Tweener.addTween(bubble3, {scaleX:1.4, scaleY:1.4, time:5, transition:"easeOutElastic", delay:2});
Tweener.addTween(bubble3, {scaleX:1, scaleY:1, time:5, transition:"easeOutElastic", delay:7});
Tweener.addTween(bubble4, {scaleX:1.7, scaleY:1.7, time:4, transition:"easeOutElastic", delay:3});
Tweener.addTween(bubble4, {scaleX:1, scaleY:1, time:4, transition:"easeOutElastic", delay:7});
Tweener.addTween(bubble5, {scaleX:1.6, scaleY:1.6, time:5, transition:"easeOutElastic", delay:4});
Tweener.addTween(bubble5, {scaleX:1, scaleY:1, time:5, transition:"easeOutElastic", delay:9, onComplete:bubbleAnimation});
}

Fantastic! The most important thing to remember is that first line, the import. You'll notice that caurina.transitions.Tweener is the same as the folder structure for the Class. You're telling Flash to look inside there for code to use on this frame. You MUST do this on any frame you use Tweener code! It's a bit easy to forget but you'll get the hang of it soon!

After that you can see we've called a simple function, bubbleAnimation. Following the call, we define the function. The function just contains the bread and butter of Tweener, the addTween method. The best way to think about it is that whenever you want to tween something with tweener, just use an addTween statement. Let's dissect the first one:

Tweener.addTween(bubble1, {scaleX:1.6, scaleY:1.6, time:5, transition:"easeOutElastic"});

So, first we tell Tweener to add a new tween. "bubble1" is the instance name, so point that to whatever you want to tween! Then it's just a matter of listing all the things you want to animate. In this case I am animating the scaleX and scaleY properties. These properties are the same ones you would normally use in Flash to manipulate a display object. "time" is set to 5, which means 5 seconds. So in pseudocode, this is saying "Take the instance bubble1, and make its scale 160% in both X and Y over 5 seconds." Easy! The great thing is that it uses time, which is a lot easier to understand than frames. Finally we apply one of Tweener's great transitions, "easeOutElastic". This gives the animation a nice bouncy effect. Refer to the documentation for more, there are a bunch of them!

So, we just continue through and give everything in the sequence an addTween. You'll notice that I like to put the animating for one object all in once place, with delays. So for bubble1, I'm making it larger over 5 seconds, then making it 100% again over 5 seconds. Sound weird? Well, the key is the "delay" property. Setting that to 5 in the second half of the animation tells Tweener to wait 5 seconds before doing anything. Scale up 5 seconds, scale down 5 seconds. Overall a 10 second animation. Then I just applied the same logic to the other 4 bubbles.

Finally, the looping. In the last addTween, at the end, we see

onComplete:bubbleAnimation

as a property of the Tween. This just runs the function again when everything is done! Instant looping. Very handy for slideshows, screensavers, and the like. And a LOT easier to manage than a monster timeline with 40 frame labels. I know you've all done it!

Closing
Go to the Tweener website, check out their samples and documentation. Apply it to your work. You'll start thinking about all the great ways to use Tweener, and it will be a great timesaver for you. Good luck and happy tweening!

Sample Code (AS3, CS4)
Read More Ninja Action!

Sync WoW Addons and Settings with Live Mesh

By now I'm guessing that most internet junkies are aware of the buzz-wordy thing called "Cloud Computing" so I won't go into great detail about it in this article. Rather, I am going to show you how you can use some existing cloud computing technology to make your World of Warcraft life a little bit better.

Microsoft jumped onto the cloud computing scene with a little application called "Live Mesh." Sexy ehh? Ya, I thought so too...I mean, who doesn't like that term...mesh. Just rolls right off the tongue. Any way, this application aims to accomplish at least a portion of the overall cloud computing goal...data synchronization.

So how can I use this to help me play video games you're asking? Good question! Here is how:

Modern MMOs all seem to have adopted this "build it yourself UI" concept. This allows players and developers and total assholes to create and publish "add-ons" for the game's UI. Obviously this is a fantastic thing, whereas users can now get exactly what they desire out of the in-game experience however, it does come with a few drawbacks.

  • No server based settings or state
  • No data backup or restore
  • No support for multiple clients

Now with the help of Live Mesh, we are able to fix it! To start you will need to download the Live Mesh application which is simply located at www.mesh.com. At the time of this posting the application is currently in Beta, but I can attest that it works perfectly on my Mac, PC and Smart Phone.

For the sake of this tutorial I'm going to show you how I sync my addons and settings between my Macbook and my Windows Vista machine. I'll be starting with the Macbook...but you should be able to start this process with either OS. Additionally, you may be using two computers running the same OS...that works too.

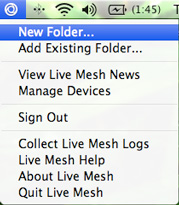
After Mesh is installed, and running you will see an icon located in your application try area. You should start by ctrl-clicking, or right-clicking the icon. This will allow you to add a new "mesh enabled" folder.

New Folder

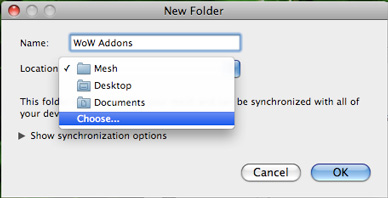
Now you'll be greated with a new folder dialog. This allows you to name the folder and choose a particular location for it. You need to name the folders according to what WoW has decided...this makes it easier in the long run.

You'll be naming the folders: Interface and LOGIN.

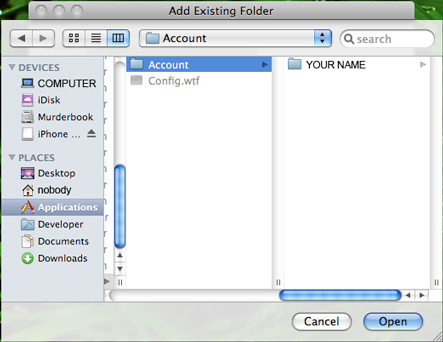
Choose Folder

At this point you are going to need to choose the two WoW folders which hold all of your of your addon settings and files. You will find each one of these folders at the following locations:

  • [WoW_Root]\Interface
  • [WoW_Root]\WTF\Account\Login Name

Folder Locations

After choosing these folders you will have effectly completed the "Mesh process" for your first machine. Now it is time to get these things syncing with a second computer.

Folder Locations

This process is actually very similar, with one key difference...you're syncing an existing Mesh folder, not adding a new one.

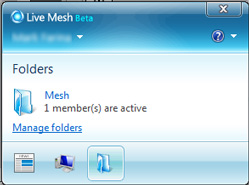
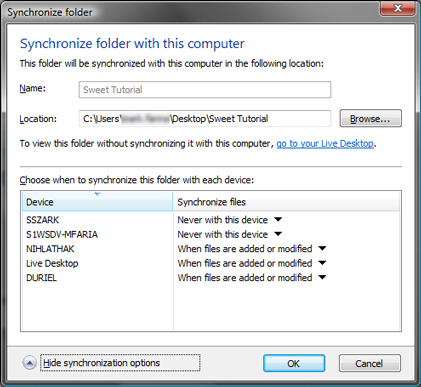
So let's start by clicking the Live Mesh icon in the application tray again. Here you will have the ability to select the folder icon. This gives you a link to "Manage folders."

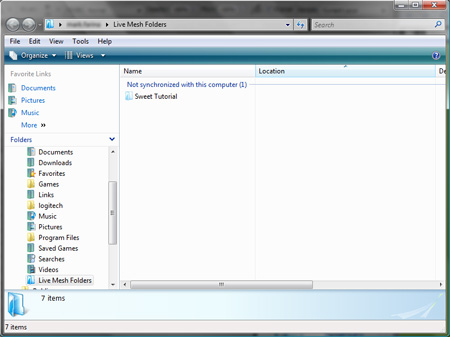
This should open the "Live Mesh folders" folder. Here you will see every Mesh enabled folder you have, including ones that are already being synced.

In this case you should be looking for two non-synchronized folders called Interface, and LOGIN.

Live Mesh Folders

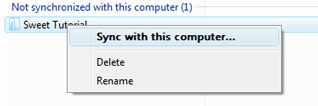
Now you will want to right-click one of the two folders and choose "Sync with this computer."

Sync Folders

For the final step you simply need to map to the new WoW folders. In case you forgot where they are...here's that list again.

  • [WoW_Root]\Interface
  • [WoW_Root]\WTF\Account\LOGIN

Sync Folders

So that is it. Once this is done you can now move back-and-forth between computers while maintaining your same settings and addons. It's great for those days when you just want to lie around on the coutch with the laptop.
Read More Ninja Action!

Coding a button in Actionscript 3

Hello everyone, I'm going to start off with some basics in Flash, beginning with adding scripts for buttons in AS3.

It's a fairly big departure from how you COULD use buttons in as2. The biggest change is that you should no longer put code on the button itself, code for buttons goes on the timeline in as 3.

1. So to begin we'll add a button to the stage. I normally just draw a box on the stage and convert to a button symbol. I find it's useful to use invisible buttons (just move the box into only the "Hit" area of the button symbol), it makes things far more flexible. In a later tutorial, I'll show you how to add an invisible button to the stage dynamically at runtime. Make sure you give your button an instance name. Let's call this one "myButton".

2. Now that we have a button on the stage, add a keyframe to your actions layer in the same frame as the button. Normally you would put this code on your timeline in the first frame the button shows up on the stage.

3. Enter the code below:
myButton.addEventListener(MouseEvent.CLICK, myButtonClick);

function myButtonClick(ev:MouseEvent):void
{
trace("myButton has been clicked.");
}


4. Let's go through line-by-line and examine the contents.
myButton.addEventListener(MouseEvent.CLICK, myButtonClick);

This adds an event listener to the button. Notice we use the button's instance name here ("myButton") as opposed to its name in the library. You can see here that we are listening to a CLICK, a simple mouse click. When we hear the CLICK, the function "myButtonClick" is run. "myButtonClick could be the name of any function you'd like to run when the button is clicked.
function myButtonClick(ev:MouseEvent):void

This is just a basic function declaration. First we have the name of the function ("myButtonClick"). Then we have a parameter in parenthesis, "ev:MouseEvent". This just means that this function needs to be passed a MouseEvent, and the function's name for that event will be "ev", which could really be anything you like. The void at the end just means that this function will not return anything, it runs and is finished.
trace("myButton has been clicked.");

This is just a trace statement for sending text to the output window during development. This area is where you would put all of the code you'd like to execute once the button is clicked.

Wrapping Up


That's all there is to it! In the FLA I've included below, I've also added listeners for ROLL_OVER and ROLL_OUT, two commonly used button states. ROLL_OVER is used to run a function when a user rolls over the button, and ROLL_OUT for when they roll back out of the button's hit state. Please refer to the FLA for instructions on how to use them in detail.

And the code here so you can see what I mean:

//http://www.ninjacamp.com
//First, add all of your event listeners
myButton.addEventListener(MouseEvent.CLICK, myButtonClick);
myButton.addEventListener(MouseEvent.ROLL_OVER, myButtonRollover);
myButton.addEventListener(MouseEvent.ROLL_OUT, myButtonRollout);

function myButtonClick(ev:MouseEvent):void
{
//Put code you'd like to execute when the button is clicked below
trace("myButton has been clicked.");
}
function myButtonRollover(ev:MouseEvent):void
{
//Put code you'd like to execute when the button is rolled over below
trace("myButton has been rolled over.");
}
function myButtonRollout(ev:MouseEvent):void
{
//Put code you'd like to execute when the button is rolled out below
trace("myButton has been rolled out.");
}

Sample Code (AS3, CS4)