


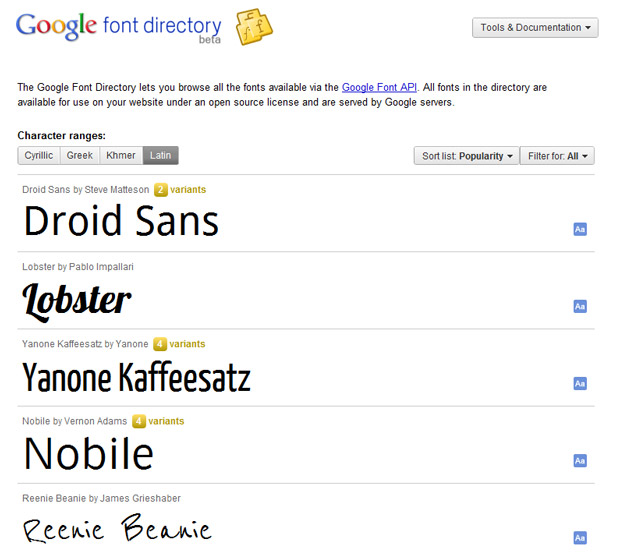
Maybe I missed the memo, but when did Google start providing a Font API? These embeddable fonts are awesome! I'm blogging about this so that I don't forget next time I go to make a website.
 Make the first comment!
At first I was going to write a scathing article about how fucking horrible Apple is to have created this new "AirPrint" bullshit and limited it to a select range of printers...but just then, I found the light!
Granted, this had nothing to do with my Apple fanboy friend telling me how "AirPrint will change the way we print since it doesn't require drivers" and all that. That's just completely untrue. Open print standards have been around since the dawn of printing. I guess I'm just saying I'm still pissed at Apple for coming up with their own way of doing things.
Anyway, let's get too it...
The basics come from this page [http://jaxov.com/2010/11/how-to-enable-airprint-service-on-windows/]. That will tell you how to install AirPrint for windows, make it a service, and setup your iOS device. The problem is...they expect you to install iTunes 10.1 to get this working!
I said, to hell with that! I wanted to set this up on my Windows Home Server, since it's the only machine I have which runs 24/7, and I'll be damned if I'm going to install full-blown iTunes on it!
Knowing that Apple is really only looking for the Bonjour service...I did some digging and found this. Bonjour Print Services for Windows is all you really need to get this AirPrint system working.
So, to rehash, do this before you follow the instructions listed in the aforementioned link.
First
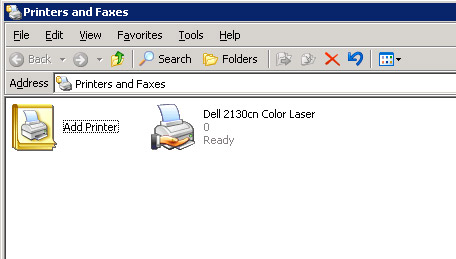
Create a new shared printer. I'm not going to show you how to do this...if you don't know, look it up.
Second
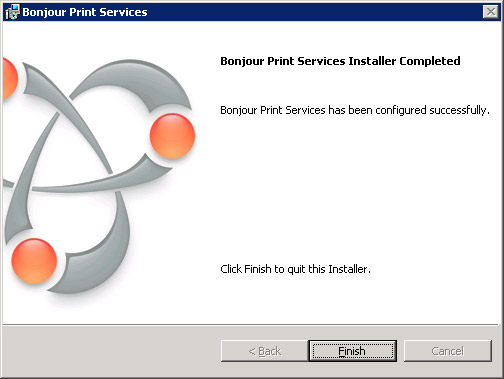
Once you've got your printer(s) installed and shared, run the Bonjour Print Services for Windows installer you downloaded.
Third
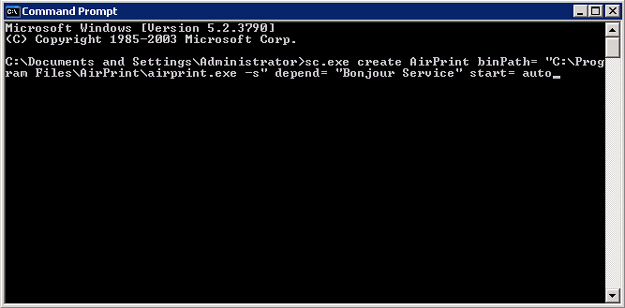
Follow the steps in the previous link to create and start your new "AirPrint" service. I'm not sure why I had to do this first, but for some reason Bonjour couldn't find my printer until this was running.
Fourth
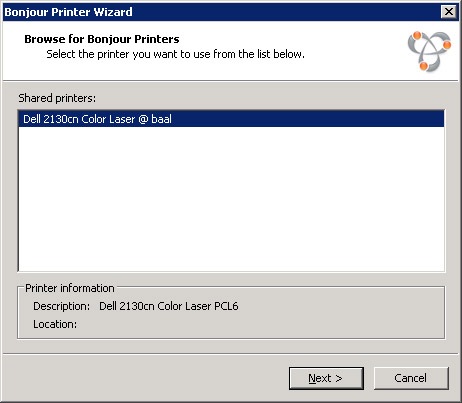
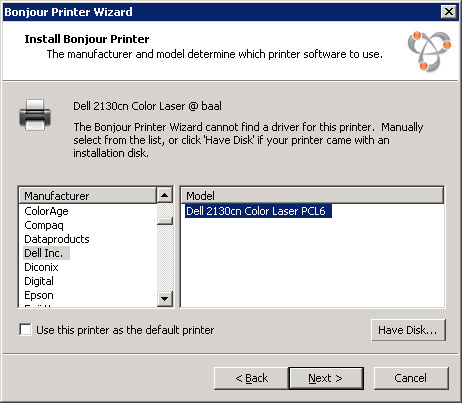
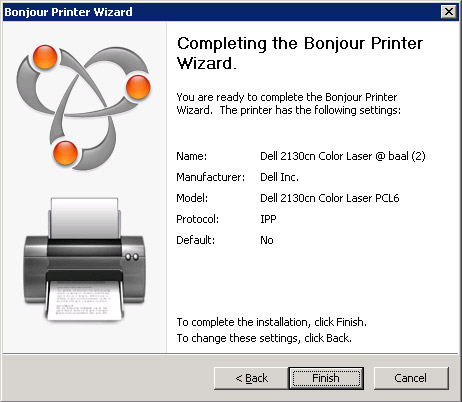
Open the Bonjour Printer Wizard from either your Start Menu or Desktop...depending on how you installed it. You should be presented with a list of Bonjour capable printers. Select and configure your printer following the screenshots below.
Fifth
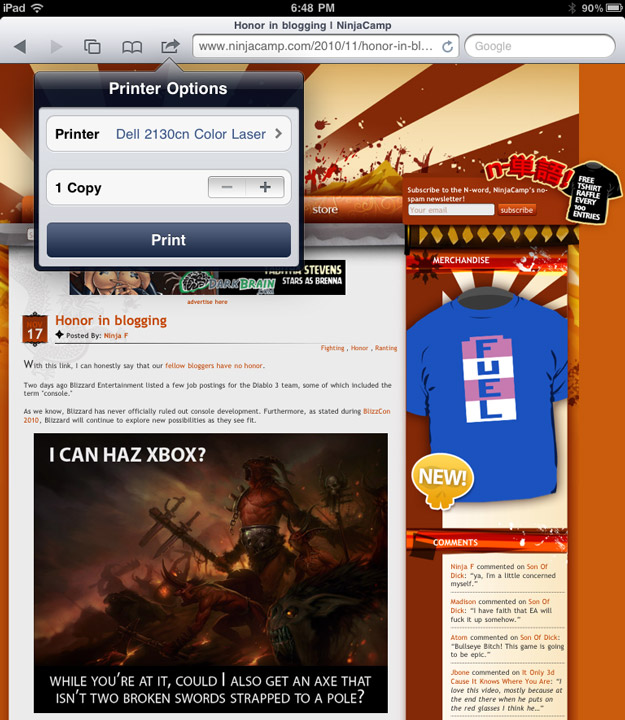
Go print something from your iOS device! Seriously...open a web page in Safari, then click the "whatever the hell that is icon" and as long as you're on os 4.2 or later, you should see "Print." Your new "AirPrint" printers will show up just like any of the high-dollar lame shit Apple just released.
Granted, this had nothing to do with my Apple fanboy friend telling me how "AirPrint will change the way we print since it doesn't require drivers" and all that. That's just completely untrue. Open print standards have been around since the dawn of printing. I guess I'm just saying I'm still pissed at Apple for coming up with their own way of doing things.
Anyway, let's get too it...
The basics come from this page [http://jaxov.com/2010/11/how-to-enable-airprint-service-on-windows/]. That will tell you how to install AirPrint for windows, make it a service, and setup your iOS device. The problem is...they expect you to install iTunes 10.1 to get this working!
I said, to hell with that! I wanted to set this up on my Windows Home Server, since it's the only machine I have which runs 24/7, and I'll be damned if I'm going to install full-blown iTunes on it!
Knowing that Apple is really only looking for the Bonjour service...I did some digging and found this. Bonjour Print Services for Windows is all you really need to get this AirPrint system working.
So, to rehash, do this before you follow the instructions listed in the aforementioned link.
First
Create a new shared printer. I'm not going to show you how to do this...if you don't know, look it up.
Second
Once you've got your printer(s) installed and shared, run the Bonjour Print Services for Windows installer you downloaded.
Third
Follow the steps in the previous link to create and start your new "AirPrint" service. I'm not sure why I had to do this first, but for some reason Bonjour couldn't find my printer until this was running.
Fourth
Open the Bonjour Printer Wizard from either your Start Menu or Desktop...depending on how you installed it. You should be presented with a list of Bonjour capable printers. Select and configure your printer following the screenshots below.
Fifth
Go print something from your iOS device! Seriously...open a web page in Safari, then click the "whatever the hell that is icon" and as long as you're on os 4.2 or later, you should see "Print." Your new "AirPrint" printers will show up just like any of the high-dollar lame shit Apple just released.
This is a quick message to all of the people who develop IE only websites or we apps…
You HAVE got to be a fucking retard if your app contains JavaScript error in IE! I mean, you don't even have to worry about other browsers and yet your shit application still contains errors?
How is this possible? Either you are a complete fucking water head, or you were too busy huffing glue to notice that the ONE DAMN BROWER you target doesn't even work!
I hope to god that you loose your job and rot in Hell for the non-stop bullshit your users have to tolerate.
Assholes!
A colleague of mine asked me an interesting question today..."how can I create a constructor for a custom object in JavaScript?" At first, I had no idea what the hell he was talking about, but then after sounding out each word slowly I got the picture.
I didn't actually know the answer, so I took just a few minutes to hack out my idea of how it would work and I ended up with this...
Basically you can see that on instantiation of the new JavaScript the internal constructor method gets executed.
I'm sure some JavaScript genius is reading this post and laughing, but fuck you...I thought it was useful!
I didn't actually know the answer, so I took just a few minutes to hack out my idea of how it would work and I ended up with this...
function Obj() {
  this.Property = null;
  var Constructor = function(obj) {
 obj.Property = "sexy";
  };
 Constructor(this);
}

var test = new Obj();
console.log(test.Property);
Basically you can see that on instantiation of the new JavaScript the internal constructor method gets executed.
I'm sure some JavaScript genius is reading this post and laughing, but fuck you...I thought it was useful!
If you are "fortunate" enough to have Microsoft Office Communicator (MOC) be your default IM system you will notice that it doesn't work correctly after the IE9 Beta install.
First off, the typing is about a full second lagged behind what you've actually typed on your keyboard. This is VERY noticeable and make MOC completely unusable in my opinion. Secondly, MOC will occasionally turn blue, then freeze for a few seconds, then return back. A behavior I've never seen before installing the IE9 Beta.
Sadly uninstalling the beta only fixes the typing issue. MOC now freezes and turns solid blue about two times per hour. It fixes itself after 3-5 seconds, but is still ultra annoying!
So in short, IE9 can suck my sausage.
I needed some JavaScript date formatting the other day, and I stumbled over this...http://blog.stevenlevithan.com/archives/date-time-format.
This allows you to quickly format/mask JavaScript dates similar to C# or PHP. With simple formats like this...
you are sure to find a use for it!
Happy Coding
This allows you to quickly format/mask JavaScript dates similar to C# or PHP. With simple formats like this...
var now = new Date();

now.format("m/dd/yy");
// Returns, e.g., 6/09/07

// Can also be used as a standalone function
dateFormat(now, "dddd, mmmm dS, yyyy, h:MM:ss TT");
// Saturday, June 9th, 2007, 5:46:21 PM

// You can use one of several named masks
now.format("isoDateTime");
// 2007-06-09T17:46:21

// ...Or add your own
dateFormat.masks.hammerTime = 'HH:MM! "Can\'t touch this!"';
now.format("hammerTime");
// 17:46! Can't touch this!

// When using the standalone dateFormat function,
// you can also provide the date as a string
dateFormat("Jun 9 2007", "fullDate");
// Saturday, June 9, 2007

// Note that if you don't include the mask argument,
// dateFormat.masks.default is used
now.format();
// Sat Jun 09 2007 17:46:21

// And if you don't include the date argument,
// the current date and time is used
dateFormat();
// Sat Jun 09 2007 17:46:22

// You can also skip the date argument (as long as your mask doesn't
// contain any numbers), in which case the current date/time is used
dateFormat("longTime");
// 5:46:22 PM EST

// And finally, you can convert local time to UTC time. Either pass in
// true as an additional argument (no argument skipping allowed in this case):
dateFormat(now, "longTime", true);
now.format("longTime", true);
// Both lines return, e.g., 10:46:21 PM UTC

// ...Or add the prefix "UTC:" to your mask.
now.format("UTC:h:MM:ss TT Z");
// 10:46:21 PM UTC
you are sure to find a use for it!
Happy Coding
I'm not going to pretend that this is some amazing discovery or anything...but I was excited when I wrote it, so now you get to see it too!
Basically using just a bit of LINQ syntax, I'm iterating through an XML document and converting it directly into my custom object.
One I have that, I can quickly build and iterate through enumerable lists of that custom object.
Neat isn't it?
Basically using just a bit of LINQ syntax, I'm iterating through an XML document and converting it directly into my custom object.
using System;
using System.Collections.Generic;
using System.Linq;
using System.Text;
using System.Xml.Linq;
using System.Reflection;

namespace MyBaddassCodeBase.NinjaCampRox
{
 public class Ninja
 {
  public int SwordsInHand { get; set; }

  public Ninja()
  {

  }

  public static IEnumerable CreateFromXML(string xmlData)
  {
   XDocument xData = XDocument.Parse(xmlData);

   var ninjas = from swordNode in xData.Descendants("Swords")
         select new
         {
          Swords = swordNode.Value
         };

   foreach (var ninja in ninjas)
   {
    Ninja nja = new Ninja();
    nja.SwordsInHand = ninja.Swords;
    yield return nja;
   }
  }
 }
}
One I have that, I can quickly build and iterate through enumerable lists of that custom object.
Neat isn't it?

We got loved!
Guy Ellis over at guyellisrocks.com gave NinjaCamp a nice mention regarding Ditto, the great clipboard manager for Windows.
I highly recommend the developers out there grab this tool as it saves my ass again and again!
Happy Coding!
Flash Quick Tip: How to make a MovieClip behave like a button with the mouse cursor
 Posted By:
Unknown
Posted By:
Unknown
Hi everyone, just a quick tip.
Have you ever wanted to use a MovieClip on the stage as a button? It happens a lot, sometimes you don't want to animate both artwork and a button around and you just want to use the MovieClip itself as the button. You can assign your listeners and everything on the clip, but when you preview the movie the mouse cursor doesn't turn into the little hand as you roll over it. It makes it hard for the user to know that area is interactive. Here's how you fix it!
First, make a MovieClip on the stage and give it the instance name of myButton. Then, on the timeline, enter this code:
Now Flash knows to treat your clip like a button as far as the mouse cursor is concerned. Enjoy!
Have you ever wanted to use a MovieClip on the stage as a button? It happens a lot, sometimes you don't want to animate both artwork and a button around and you just want to use the MovieClip itself as the button. You can assign your listeners and everything on the clip, but when you preview the movie the mouse cursor doesn't turn into the little hand as you roll over it. It makes it hard for the user to know that area is interactive. Here's how you fix it!
First, make a MovieClip on the stage and give it the instance name of myButton. Then, on the timeline, enter this code:
myButton.buttonMode = "true";
Now Flash knows to treat your clip like a button as far as the mouse cursor is concerned. Enjoy!
Hey everyone!
Today I'll be helping you with a quick tutorial on using the "parent" property in Actionscript 3. If you're used to how things worked in AS2 you know that you can no longer refer to the parent of a clip with this simple notation:
First, I've made a movie with a clip on the timeline. I wrote a function on the mail root level of the timeline that looks like this:
Very simple. Check out the source below for an example clip using this technique, and happy coding!
Sample (AS3, Flash CS4)
Today I'll be helping you with a quick tutorial on using the "parent" property in Actionscript 3. If you're used to how things worked in AS2 you know that you can no longer refer to the parent of a clip with this simple notation:
myClip.parent.parent.parent.myMethod();The compiler is more strict and so they've changed the syntax a bit. I want this to be a beginner's tutorial so I won't go into detail about that, let's work on the new way to do things!
First, I've made a movie with a clip on the timeline. I wrote a function on the mail root level of the timeline that looks like this:
function traceParent():void
{
trace("You've succesfully called on the parent!");
}
Easy, just a trace statement to see if what we code inside the clip is correct. Now, put a clip on the stage and INSIDE the clip put this script:myButton.addEventListener(MouseEvent.CLICK, callOnParentClip);
function callOnParentClip(ev:MouseEvent)
{
(this.parent as MovieClip).traceParent();
}
Pretty easy! Above the content inside this clip, make sure you make a button called myButton to call this function. The key line is here:(this.parent as MovieClip).traceParent();You can see that now we have to cast the clip as a MovieClip specifically. What about if we have a clip more than one level deep? This is how you would handle that:
(this.parent.parent.parent as MovieClip).traceParent();
Very simple. Check out the source below for an example clip using this technique, and happy coding!
Sample (AS3, Flash CS4)