


 Posted By:
What is Tweener?
Tweener, homepage here, is one of several third-party classes designed to control animation in Flash. It can be used for simple things like animating something across the stage, or more complicated things like applying easing to custom variables in your code. I use it a lot in my work, and once I started it was obvious what a great help tools like Tweener can be!
First, get it!
This is the first step. Go to the page above and download the latest version, which will be a zip file with a folder structure containing some actionscrpt files. Most of us have a centralized location for all of our work, and you'll want to unzip the files to that location. Really, Tweener can be put anywhere on your computer your Flash files can access it. You only need to download it once, then you point each Flash file that needs to use it right to that folder.
Let's begin
Create a new blank as3 file in Flash. Save it to your hard drive whereever you like. Now the first step is to point that file to the Tweener installation so that it knows where to look for all that code.
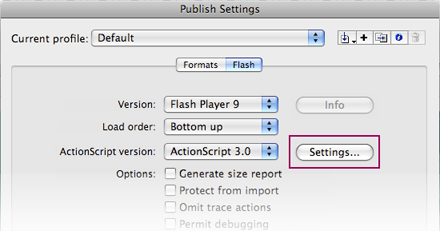
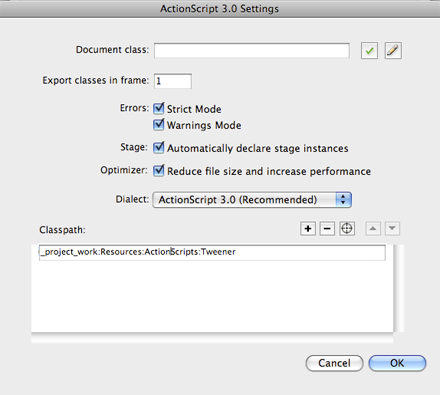
Select "File" > "Publish Settings" from the File menu. Next to "Actionscript Version" there is a button that says "Settings...". Select that. At the bottom of the next window you'll see "Classpath:". This area is where you can enter all of your third-party classes so Flash can use them at runtime. Click the little target icon and navigate to the main folder of your Tweener installation. It should be the highest in the heirarchy, and contain a folder called "Caurina" which has everything else within. That's it, you're ready to use it now!
Set up your content
This is going to be a very simple example, but one which is also highly useful. One of the benefits of animating with code as opposed to the timeline is that we can react to events from within the code quite well. In this case, we can set a sequence of animations into action, and then replay them all again once the initial sequence is finished. It's looping animation without using the timeline, and highly flexible!
First, I've created a layer for my content and one for my actions. In my content layer, I've simple created 5 bubble shapes with instance names bubble1 - bubble5. It's important to give anything you'd like to animate with Tweener an instance name! Tweener uses these names (not the symbol name!) to call on things on the stage. After this, it's as simple as copying and pasting this code into your actions layer, all on frame 1:
import caurina.transitions.Tweener;

bubbleAnimation();

function bubbleAnimation():void
{
Tweener.addTween(bubble1, {scaleX:1.6, scaleY:1.6, time:5, transition:"easeOutElastic"});
Tweener.addTween(bubble1, {scaleX:1, scaleY:1, time:5, transition:"easeOutElastic", delay:5});
Tweener.addTween(bubble2, {scaleX:1.5, scaleY:1.5, time:4, transition:"easeOutElastic", delay:1});
Tweener.addTween(bubble2, {scaleX:1, scaleY:1, time:4, transition:"easeOutElastic", delay:5});
Tweener.addTween(bubble3, {scaleX:1.4, scaleY:1.4, time:5, transition:"easeOutElastic", delay:2});
Tweener.addTween(bubble3, {scaleX:1, scaleY:1, time:5, transition:"easeOutElastic", delay:7});
Tweener.addTween(bubble4, {scaleX:1.7, scaleY:1.7, time:4, transition:"easeOutElastic", delay:3});
Tweener.addTween(bubble4, {scaleX:1, scaleY:1, time:4, transition:"easeOutElastic", delay:7});
Tweener.addTween(bubble5, {scaleX:1.6, scaleY:1.6, time:5, transition:"easeOutElastic", delay:4});
Tweener.addTween(bubble5, {scaleX:1, scaleY:1, time:5, transition:"easeOutElastic", delay:9, onComplete:bubbleAnimation});
}
Fantastic! The most important thing to remember is that first line, the import. You'll notice that caurina.transitions.Tweener is the same as the folder structure for the Class. You're telling Flash to look inside there for code to use on this frame. You MUST do this on any frame you use Tweener code! It's a bit easy to forget but you'll get the hang of it soon!
After that you can see we've called a simple function, bubbleAnimation. Following the call, we define the function. The function just contains the bread and butter of Tweener, the addTween method. The best way to think about it is that whenever you want to tween something with tweener, just use an addTween statement. Let's dissect the first one:
Tweener.addTween(bubble1, {scaleX:1.6, scaleY:1.6, time:5, transition:"easeOutElastic"});
So, first we tell Tweener to add a new tween. "bubble1" is the instance name, so point that to whatever you want to tween! Then it's just a matter of listing all the things you want to animate. In this case I am animating the scaleX and scaleY properties. These properties are the same ones you would normally use in Flash to manipulate a display object. "time" is set to 5, which means 5 seconds. So in pseudocode, this is saying "Take the instance bubble1, and make its scale 160% in both X and Y over 5 seconds." Easy! The great thing is that it uses time, which is a lot easier to understand than frames. Finally we apply one of Tweener's great transitions, "easeOutElastic". This gives the animation a nice bouncy effect. Refer to the documentation for more, there are a bunch of them!
So, we just continue through and give everything in the sequence an addTween. You'll notice that I like to put the animating for one object all in once place, with delays. So for bubble1, I'm making it larger over 5 seconds, then making it 100% again over 5 seconds. Sound weird? Well, the key is the "delay" property. Setting that to 5 in the second half of the animation tells Tweener to wait 5 seconds before doing anything. Scale up 5 seconds, scale down 5 seconds. Overall a 10 second animation. Then I just applied the same logic to the other 4 bubbles.
Finally, the looping. In the last addTween, at the end, we see
onComplete:bubbleAnimation
as a property of the Tween. This just runs the function again when everything is done! Instant looping. Very handy for slideshows, screensavers, and the like. And a LOT easier to manage than a monster timeline with 40 frame labels. I know you've all done it!
Closing
Go to the Tweener website, check out their samples and documentation. Apply it to your work. You'll start thinking about all the great ways to use Tweener, and it will be a great timesaver for you. Good luck and happy tweening!
Sample Code (AS3, CS4)