Hi everyone, welcome to another NinjaCamp Flash tutorial. This time around I'll be writing about
the masking process in Flash. We'll be using masks on the timeline, the easiest way to mask content. Soon I'll write a more advanced article about dynamic masking with Actionscript 3. Let's get started!
This is what we'll be making:
It doesn't look like you have a flash player...at least I can't find it. I'd tell you to get one...or to go to sites like Adobe.com, but you know...I'm not the boss of you.
First, the basics of masks.
We use masks when we want to hide part of something on the stage. In other words, we mask parts of an object. Normally this isn't very exciting, but the real benefit of masks come in when you animate them to produce cool effects in Flash. This has a lot of applications- gaming, information design, web content, you name it. They are very commonly used and you should add them to your Flash toolkit.
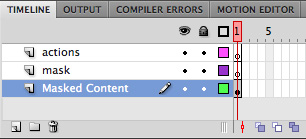
I'm going to show you how to set up a basic mask on the timeline and animate it, revealing a logo (in this case, a MovieClip). I've set up a simple Flash file with some artwork and the following layer structure:
This animation is going to be a simple reveal from right to left, but you can get really crazy if you want. Masks can be any shape, and the color doesn't matter. On the timeline, Flash doesn't support gradient masks very well, but I have a tutorial about that coming soon as well, so learn the basics first and come back for that later! I'm going to draw a simple box on the stage in my "mask" layer. I position it to the left of the logo artwork and make sure it is tall enough to completely cover the logo. The width is unimportant, as I will be animating that to fit. I normally use bright colors for these shapes so it's easy to tell where my masks are. Here is what my stage looks like after this step:

Now common sense might tell you that the mask would cover and hide whatever it's over, so why did we move it off to the side if we want the logo hidden to begin? Well, Flash works in a counterintuitive way with masks,
the areas of the masked content which are covered with the mask will be visible. So, to completely show an object the mask must cover the object completely. No problem! the next step is to make our mask a MovieClip so it can be animated easily. Some people use shape tweens for this but I like the flexibility of using the same mask elsewhere in my movies. Select the mask artwork on the stage and press F8, or in the menu "Modify > Convert to Symbol...". Name the symbol "myMask" or something similar, make sure type is set to Movie Clip and press OK to close the dialog. On the stage, your mask should now be a MovieClip object. Good work!
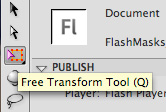
The next thing I usually do is adjust the centerpoint of the mask clip on the stage so it will tween properly. Select the Free Transform Tool from your toolbar. It looks like this:
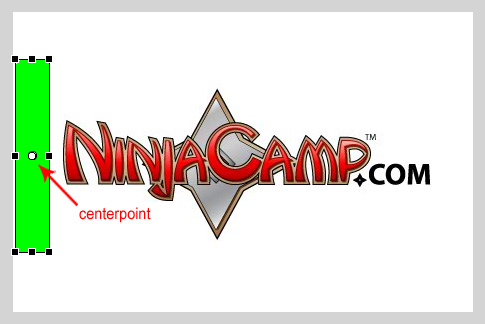
Next, select the mask on the stage. You should see transform handles around the clip and a
circle in the middle representing the centerpoint, or point from which animation will be based. See the image for reference:
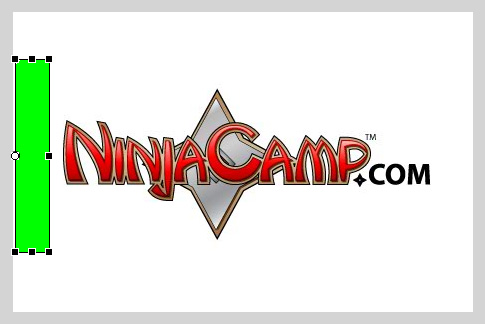
Click and drag the centerpoint to the left side of the clip, as we will be animating it to the right. It should look like this when complete:
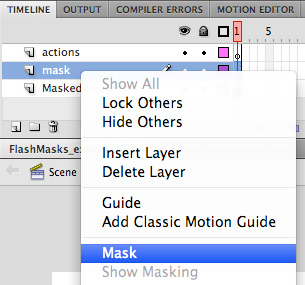
Before we animate there is a special and important step we need to take. We need to make our mask clip a mask! To do this, right click the layer name "mask" in the timeline. Choose "Mask" from the menu:
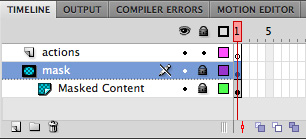
A few things will change with your layers on the timeline. Your "mask" layer will have a new mask icon next to it for starters. The "Masked Content" layer will also have a new icon showing that it is being affected by the mask, it will also be indented a bit. Keep in mind that Flash only does this to the layer directly below the layer you made a mask, but you can drag additional layers beneath the mask, a mask layer can affect more than one content layer. Also, both of our layers have been locked. See the image:
On the stage, everything is gone?! Don't panic! Let's think about this... our mask was not covering the logo on the stage, and when we made it a mask it disappeared. This is because masks themselves are never visible in the final output. Since the logo is not covered with its mask, it too has vanished. We just need to animate the mask to cover the logo and make it appear again.
In the editing tool, Flash will only show content being masked properly on the stage if the mask layer and all masked content layers indented beneath it are locked. Keep in mind that this is only while editing a movie, when you export the .swf Flash will always mask everything correctly no matter how the layers are locked or unlocked. So, unlock the mask layer so we can animate it! Everything is visible again, so relax ;)
Finally we animate the mask and bring it all together. I'm going to make my animation 30 frames long, so I add those frames in all three layers (by selecting the 30th frame in each layer and pressing F5), and add a "stop" action to the final frame of "actions" (which I made a keyframe with F6). I just want to reveal my logo, I don't want it to loop endlessly. See the result:

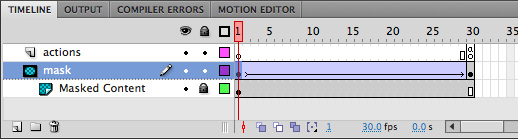
I have to admit to you, I still use the classic tweens in Flash for simple things like this. The new tweening system in CS4 seems to be quite powerful, but it tends to make me pull my hair out sometimes. Let's use a classic tween for this mask as well. Select the 30th frame of the "mask" layer and press F6, making it a keyframe (Insert > Timeline > Keyframe from the menu). Go back to frame 1, right click it, and select "Create Classic Tween". You should see a blue arrow going from frame 1 to frame 30 like this:
With frame 1 selected, I usually go to my "Properties" panel and set easing to 100 under "Tweening". This will make the mask slow gradually as it approaches the end of the animation, which for me is a bit more visually pleasing than an abrupt stop. Finally, select the final keyframe, select the mask on the stage with the Free Transform Tool, and drag the right side of the mask all the way to the right, just covering the logo completely. See it here:

All done! You can either lock the "mask" layer and scrub the timeline to see the effect, or just test your movie by pressing Command/Control and Enter. Pretty cool! Try and think of some interesting things you can do with masks, and I will follow up with some more advanced techniques in later tutorials. Take care!
Sample (AS3, Flash CS4)


 Posted By: