


 Posted By:
Microsoft jumped onto the cloud computing scene with a little application called "Live Mesh." Sexy ehh? Ya, I thought so too...I mean, who doesn't like that term...mesh. Just rolls right off the tongue. Any way, this application aims to accomplish at least a portion of the overall cloud computing goal...data synchronization.
So how can I use this to help me play video games you're asking? Good question! Here is how:
Modern MMOs all seem to have adopted this "build it yourself UI" concept. This allows players and developers and total assholes to create and publish "add-ons" for the game's UI. Obviously this is a fantastic thing, whereas users can now get exactly what they desire out of the in-game experience however, it does come with a few drawbacks.
- No server based settings or state
- No data backup or restore
- No support for multiple clients
Now with the help of Live Mesh, we are able to fix it! To start you will need to download the Live Mesh application which is simply located at www.mesh.com. At the time of this posting the application is currently in Beta, but I can attest that it works perfectly on my Mac, PC and Smart Phone.
For the sake of this tutorial I'm going to show you how I sync my addons and settings between my Macbook and my Windows Vista machine. I'll be starting with the Macbook...but you should be able to start this process with either OS. Additionally, you may be using two computers running the same OS...that works too.
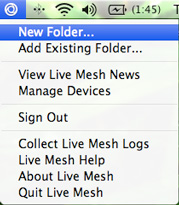
After Mesh is installed, and running you will see an icon located in your application try area. You should start by ctrl-clicking, or right-clicking the icon. This will allow you to add a new "mesh enabled" folder.
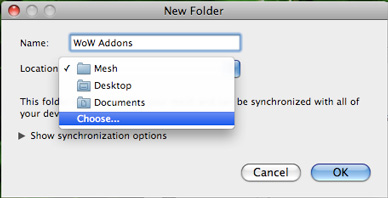
Now you'll be greated with a new folder dialog. This allows you to name the folder and choose a particular location for it. You need to name the folders according to what WoW has decided...this makes it easier in the long run.
You'll be naming the folders: Interface and LOGIN.
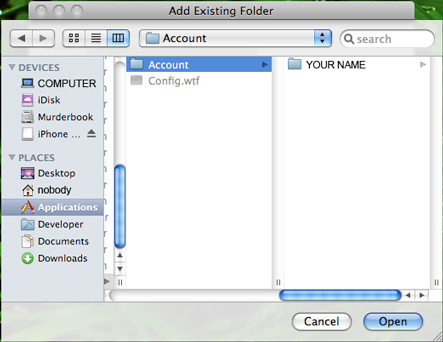
At this point you are going to need to choose the two WoW folders which hold all of your of your addon settings and files. You will find each one of these folders at the following locations:
- [WoW_Root]\Interface
- [WoW_Root]\WTF\Account\Login Name
After choosing these folders you will have effectly completed the "Mesh process" for your first machine. Now it is time to get these things syncing with a second computer.
This process is actually very similar, with one key difference...you're syncing an existing Mesh folder, not adding a new one.
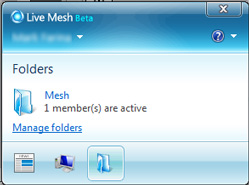
So let's start by clicking the Live Mesh icon in the application tray again. Here you will have the ability to select the folder icon. This gives you a link to "Manage folders."
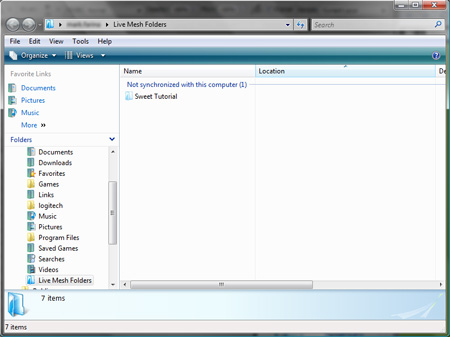
This should open the "Live Mesh folders" folder. Here you will see every Mesh enabled folder you have, including ones that are already being synced.
In this case you should be looking for two non-synchronized folders called Interface, and LOGIN.
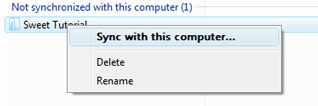
Now you will want to right-click one of the two folders and choose "Sync with this computer."
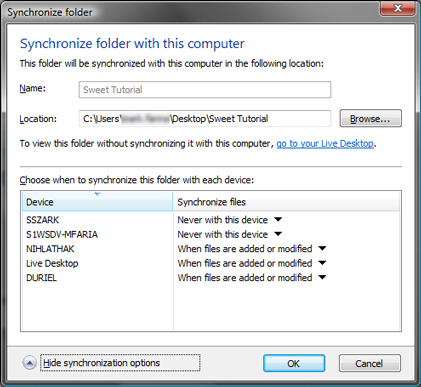
For the final step you simply need to map to the new WoW folders. In case you forgot where they are...here's that list again.
- [WoW_Root]\Interface
- [WoW_Root]\WTF\Account\LOGIN
So that is it. Once this is done you can now move back-and-forth between computers while maintaining your same settings and addons. It's great for those days when you just want to lie around on the coutch with the laptop.
 Comments: 5
